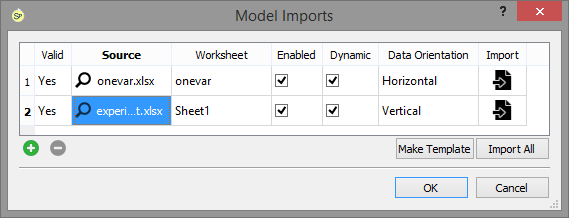
Use the Import Data dialog box to select the options you want to use when importing model data from a linked Excel file. For more information, see Setting Up Import Links.
To open the Import Data dialog box, choose Import Data from the Model menu.
Each link is shown in a separate row. Use the ![]() button to add a new link. Then, use the columns to set up information about the link. To remove a link, click on the number of the link you want to remove, and then click on the
button to add a new link. Then, use the columns to set up information about the link. To remove a link, click on the number of the link you want to remove, and then click on the ![]() button.
button.
Valid
This column indicates whether the data source you've specified exists and can be read. It will say No until you select a source, and will also say No if you have an existing link, but the file is missing or unreadable.
Source
This specifies the file from which the software will read the data. Click on this field to open a File Selection dialog and choose a file. If the file can't be used, most commonly because all its worksheets are already specified for importing or exporting data, an error message will appear.
Note: The file should be located in the same directory as the model, or a subdirectory of the model directory, named data. If you use a file from a different location, copying the model to a different computer will likely make the link invalid.
Worksheet
This option is only applicable to Excel files. After you've selected the file, the first worksheet it contains will be shown. Click on the name of the sheet to enable the dropdown list
. Then, click on the name of a worksheet to select the worksheet you want.
Note: You can only choose worksheets not already in use by other import or export links. If there's a single worksheet available, it will be chosen and no dropdown list will be shown.
Enabled
Check this option to enable the link for Import All on this dialog, and for automatic import after any change if Dynamic is checked.
Dynamic
Check this option to have the specified link be executed when the model is opened and any time that the source file changes.
Data Orientation
This specifies the orientation of the source data. If Vertical is selected, then variable names should appear along a row, with the associated values directly underneath them. If Horizontal is selected, then variable names should appear in a column, with associated values to their right.
Import
Click on the
button to import from the designated link. The import will be attempted regardless of the Enabled and Dynamic settings. A message will be shown about the success of, or problems with, the import.
Click on this button to create a template for importing all model constants and graphical functions. A small dialog will appear, allowing you to choose a file and specify an orientation:
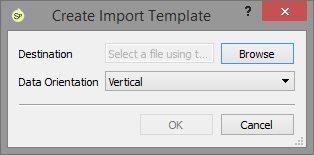
Choose a file by clicking on Browse (and if you select an Excel file, choose a worksheet), then choose an orientation. When you click OK, the file will be filled with all model constants and graphical functions whose values can be imported. You can then select the portions of this you want to use to create import files, in order to change those values.
Click this button to import from all of the links that are marked enabled. This will happen whether the links are marked dynamic or not. A message will be displayed showing the results of all the imports. If you have many links, this is a convenient way to check that they're all working as expected.
Click OK to save the changes you've made to links. Click Cancel to discard them. If you've executed any imports, the data from those will still be in your model.
Note: Importing data is not part of the Undo/Redo system. Once you've imported a value, then the associated equation for the constant, or the graphical function's list of points, will be permanently changed.